Tuesday, April 22, 2014

Denim Pocket Hot Pads

These hot pads are quick and easy to make.
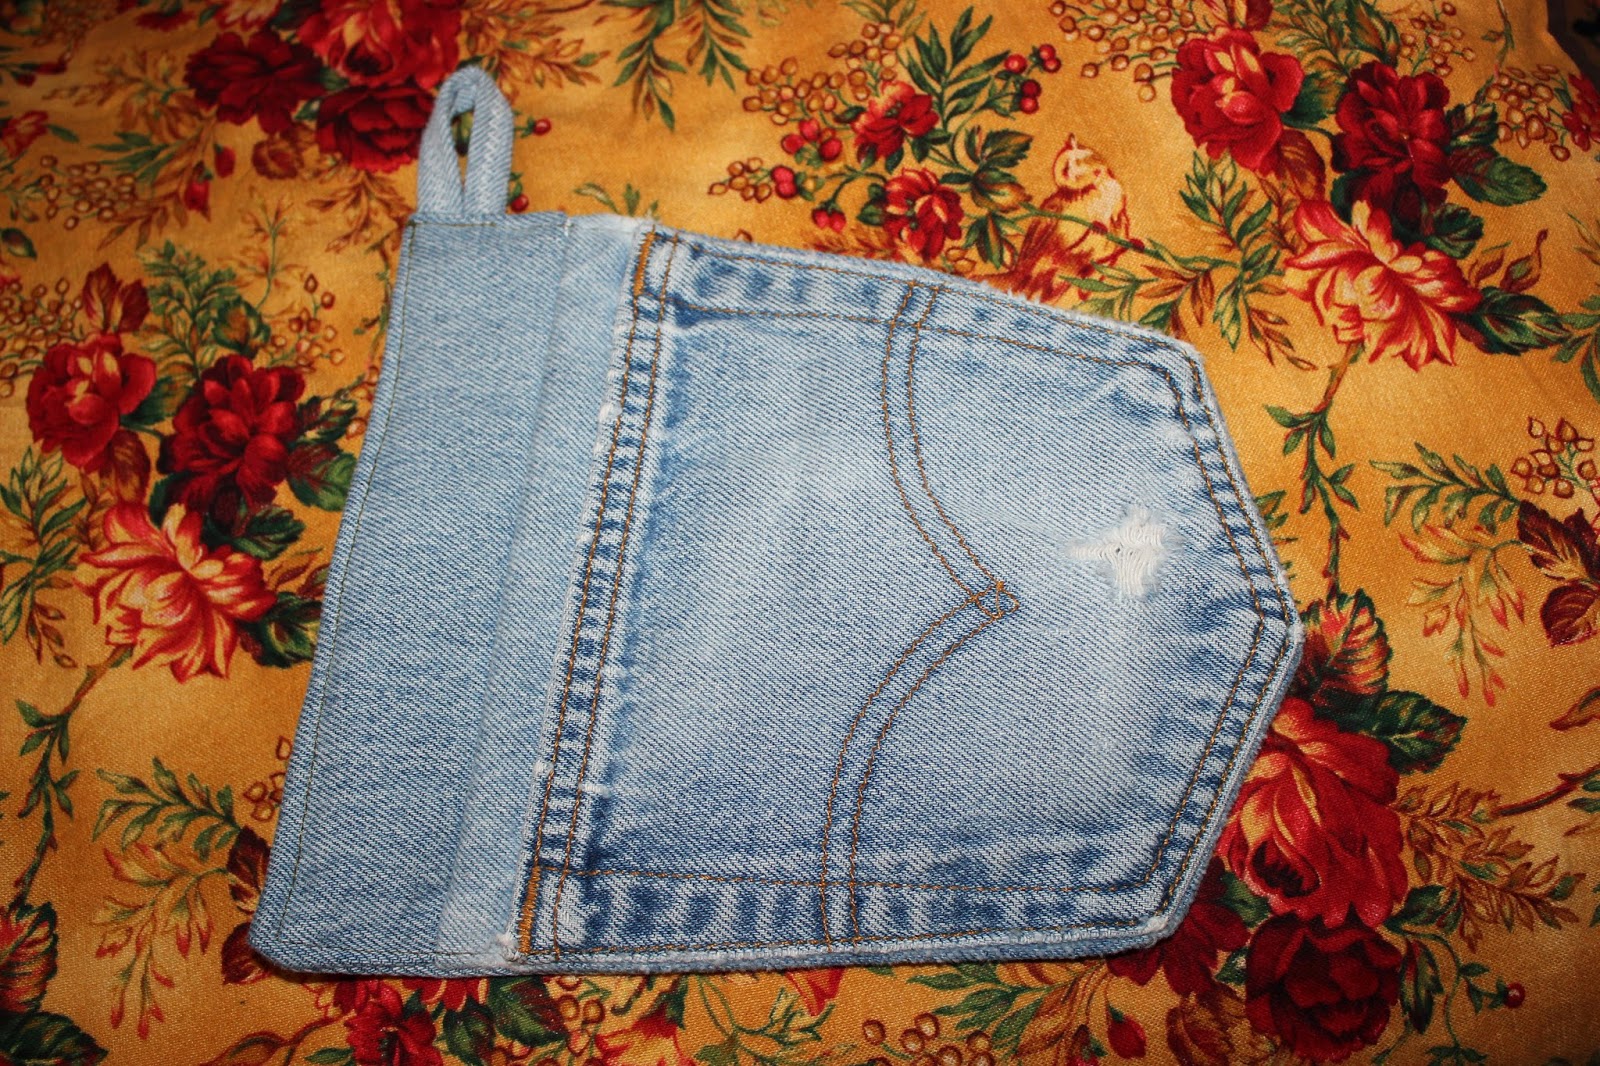
There was not much room from the top of the pocket to the thick seam so I cut it off and added the blue to the top.


This one is drawn on like the Tattoo Denim Quilt.  It is done with a Sharpie.
This was made from the left over denim I used for the quilt.  I have a hard time wasting anything and this worked out great.  I wrote on the one that did not have a pocket because I didn't want it to be plain.  The dots on this are just stains from work.  I like the dots.

I think that next time I will quilt the batting to the backing of the hot pads for some texture.  I used cotton 80/20 batting.  I can't remember what the brand is because I was using my scraps from other projects.


This one notice I cut above the seam at the top of the pocket.  I think it turned out well but the bulk was a little difficult to sew.  It kept wanting to flip out of the seam.  I think if you have a great machine, do it.  It is less figuring.  I did top stitch around each one.  The top stitching was over the top of some of the pocket stitching, but it turned out well.

To make these you first cut out your pocket leaving as much at the top as possible and around the pocket at least a half inch, a little more is better. You will need at least 2 1/2 inches above the pocket if you are not adding fabric there.  You sew the accent fabric across the top of the pocket.  Cut your batting and backing to fit the pocket layer.  Place the pocket and the backing right sides together with the batting on top of the backing.
You see the line around the pocket.  That is where your sewing machine foot is lined up with and you sew all the way around leaving a four inch space to turn inside out. Trim your batting close to your stitching and the denim about 1/4" around.  Fold in your opening making sure you have your loop tucked in and top stitch around the edge.

A belt loop or outer seam works for the loop.

Tuesday, April 15, 2014

A Tattoo Denim Quilt

I made this denim quilt for our niece and her husband, for their wedding.  I was contemplating how to show our love to them and thought that writing it out in quotes would work.  Her father had past away and I was able to get a pair of his old pants to put into this quilt.

To make the quilt I cut up a bunch of old worn out denim pants.  I was given a bunch because I had given my last stash to someone else.  Any way I use all sorts of sizes of blocks and wrote a bunch of love and family quotes.  I even went to Kellie's pintrest to see what sort of things she liked to add to it.  She had a few tattoos pined and I added those to the blocks of the quilt.  I drew with Sharpies directly on the denim.  If i was unsure on some things if they would fit I used chalk to write it first so that I could just wipe it off.


As I was writing on the blocks I decided that some color was a good addition.

This was the initial that was on their invitation.  I wanted to incorporate as much as I could of the things that meant a lot to them.

This was one of the tattoos she had pinned.  I was also laying it out to see where each block fit.  I don't plan ahead well so this is what I did.

I saw a date that was embroidered like this so I  made one too with Sharpie.
I left some of the quilt blocks blank in case they wanted to have guests sign the quilt at the wedding reception.


I tied this quilt upside down so that the ties were on the back.  To tie upside down you put the quilt top on the frame first facing down, then the batting, and last the back which is flannel in this case facing up.  It is tied with blue yarn so that it won't distract from the quilt top.  I also turned the blocks every which way so that there was no one way to look at it.  If it ended up as a picnic quilt you could sit anywhere and still read some of it.

Children's Denim Quilt

Made by Sophie
 These are the blocks that my daughters are making.  They are four and seven years old.  They are taking the remaining denim and making their own quilt.  They are fun to keep my girls involved in what I am doing and the art work that they draw themselves will be memories for us all.  Theirs is not done.  They have a shorter attention span but here are some samples of their work.
Made by Zoey


Wednesday, April 9, 2014

Eye Candy For Your Pin Keep


 These pins are made from polymer clay onto a glass head pins.  They really add a fun touch to your pin cushion.
 These are made using my imagination and just sculpting.  The flowers are done with a mold.  Some of the green is glow in the dark.
 The kids and I will sit and sculpt for hours together.  They make beads too with theirs.
 After you sculpt your polymer clay you bake it as the package specifies.  It hardens and they are good to be used.  It is fun to see them as you pick pins from the pin cushion.  Like I say it is eye candy for the pin cushion.  My husband calls it bling for the pin cushion.
 This is sushi.  Who doesn't love a good crab roll.  I love the eggs on top too.
I have been making decorative pins for the Quilt Walk, that we have here in Panguitch.  It is the second weekend in June.  It is a celebration in remembering the past history of Panguitch and we have a quilting retreat to go along with it.  Our town puts a lot of work into this festival and really make it a load of fun.  We have so many wonderful volunteers that make the Quilt Walk nice for everyone.  The web address is quiltwalk.org.  Everyone that signs up for a class gets a small decorative pin in their box.